Another week has come and gone and here I am showing what I have done during the week. I finished the main window, meaning the only objects still needing to be modeled in the spires or the top portion of the main building are detail pieces. The door has been coming along nicely.For the frame itself, I am only missing a handful of detail items. Once these items are finished, I can quickly model the door which just looks like an iron gate. With the door blocked in and nearing completion, at least to an equal point to the spires or windows, the only major piece to add is the central spire. I am hoping the central spire goes together quickly, so by next weekend I have a fully modeled cathedral. Once I am done modeling, I am thinking of posting the finished image of the gray model on a few sites to get some feedback. From the people I have shown in person, they have all been very impressed, so I am hoping to get something a little more constructive out of the internet. While waiting for replies, I will try to get the building UV unwrapped. After unwrapping all that will be left will be to texture, make a final render and a bit of post production work. If I continue to work like I have been and nothing comes up in the foreseeable future, I would expect this to take until mid December.
Besides the cathedral, I have been working on one other piece. It is nowhere near complete enough to show off, however, I am hoping to eventually offer the 3D model for sale. I have thought about trying to work the cathedral into a 3D print, but it would be on a very small scale since the model is over one hundred meters tall.Hopefully when this project has a slow point for visible progress, my other project will be in a decent enough completion that I can show it off. I have also been considering going back to a project which I nearly finished and see if I cannot just add the final details and get several pieces done at once. With any luck, I would like to have those two projects finished by the end of the year to at least have something to show off for a year's worth of effort.
Well, I think I dreamt enough for this post. Until next time,
~gunnah
Showing posts with label 3D art planning. Show all posts
25 November 2013
11 November 2013
Work in Progress: Gothic Revival Cathedral (Part II)
So last post I had been fairly brief about this new project and why I had moved away from the original Gothic cathedral. Probably the biggest motivation to change was because my computer died and I had been unsure of when I would be able to re-access my old files again. The good news is that this time around, I did not loose them, so I am not starting over from square one like the last few times my computer died. But now onto what separates Gothic Revival from Gothic architecture. The spires to the left are nearly done, I will briefly mention what is missing, but for the most part they are complete. The obvious difference, much less ornate. In my original Gothic cathedral buttress, nothing was bare. In very few spots were there straight, flat, vertical walls. If it were not an arch it were a pillar filling up the space. These spires are quite different. Outside a few windows, it is not until above the buttress that there is any sort of complexity. Almost two-thirds of the height is taken up by an uninterrupted sheer face. However, this simplicity makes the parts which are ornate stand out that much more. Many of the stylings are quite similar between the two projects, especially the detail in the vaulted windows. Hopefully, I will have the spires completely modeled for the next post just to show the difference between the two designs.
Now to quickly go over what is wrong or missing. The windows near the top of the buttress need some work after looking at the image again.They just do not seem vaulted enough. Also, the are suppose to sit flush against the wall, though I think this, if textured well enough, could make the model look better than the reference. Next, the small corner spires are missing the cross on top. Also missing the cross are the small little projections from the corner spires. The central spires are missing a projection window about two-thirds the way up and a cross on top. The brace going between the spires has a cut out in the reference, but I am unsure if it would even be noticeable in this image.
Once the spires are done, I can move to the main door and start filling in the gap between the spires. After that piece is complete, the only piece left of this project will the the main spire, but that is likely a decent way away. My goal is to get the building modeled and then texture, trying to keep focused on one task at a time. Until next time
~gunnah
Now to quickly go over what is wrong or missing. The windows near the top of the buttress need some work after looking at the image again.They just do not seem vaulted enough. Also, the are suppose to sit flush against the wall, though I think this, if textured well enough, could make the model look better than the reference. Next, the small corner spires are missing the cross on top. Also missing the cross are the small little projections from the corner spires. The central spires are missing a projection window about two-thirds the way up and a cross on top. The brace going between the spires has a cut out in the reference, but I am unsure if it would even be noticeable in this image.
Once the spires are done, I can move to the main door and start filling in the gap between the spires. After that piece is complete, the only piece left of this project will the the main spire, but that is likely a decent way away. My goal is to get the building modeled and then texture, trying to keep focused on one task at a time. Until next time
~gunnah
23 September 2013
Work-in-Progress: Cathedral (Flying Buttress Part I)
To challenge myself to bring my modeling to a new level, I have picked to model something that is probably at the limit of my modeling skills: the Gothic Cathedral. I have always found these structures to be very impressive, but what I feel is unique is the high level of detail on the exterior of the building worked into the stone. So far I have made the most repeated unit of the cathedral, the flying buttress. The model, not textured, is to the right, though the image is slightly warped just from the scale of the model. I am making the model in real units and the top of the highest cross on the buttress is just over seventy meters tall. I feel fairly pleased with how the model came out, though I want to texture it before I put it on a forum or two for critiques. Hopefully, I can get the textures done fairly quickly, though there are quite a few pieces to this model and that is likely to slow down the overall speed. My only concern is the amount of memory it is going to take to render the overall scene. This model alone has about 125,000 polygons and is going to be repeated quite a few times around the finished model. Of course I am going to try every possible way to cut back, especially when putting together the final model, but for the level of detail in this style of building, I needed that many polygons. There are section I would have used more, but I had to cut back, trying to remember objects a few centimeters in size are unlikely to even be noticeable in the final render.
Once this section is done, I have broken down the rest of the building. The doors will be next and while not especially difficult, they do have sculptures all around which means a high polygon count for them also. Then comes the spires, one of the defining aspects of this kind of building. While the doors will likely have a higher polygon count, I know I will need to devout a sizable number to get the overall shape, even if I am not going for an excessively high level of detail. The spires also have several sculptures, most notably the gargoyles which stand sentinel over the building. Finally comes the building of the cathedral itself. This will be of moderate polygon count since most of the detail is handled in one of the other pieces, but the large amount of stained glass will eat up polygons. While probably not realistic, I am hoping the final model will be about three million polygons. I am not completely sure if my computer can handle this, but I know if it gets much higher the chances will go down drastically.
Finally the schedule. I am trying to do this for a contest, though I do not want to sacrifice the render for finishing on time. With that in mind, I am hoping to finish one section of the building each week, which means I am already behind. Until next time,
~gunnah
Once this section is done, I have broken down the rest of the building. The doors will be next and while not especially difficult, they do have sculptures all around which means a high polygon count for them also. Then comes the spires, one of the defining aspects of this kind of building. While the doors will likely have a higher polygon count, I know I will need to devout a sizable number to get the overall shape, even if I am not going for an excessively high level of detail. The spires also have several sculptures, most notably the gargoyles which stand sentinel over the building. Finally comes the building of the cathedral itself. This will be of moderate polygon count since most of the detail is handled in one of the other pieces, but the large amount of stained glass will eat up polygons. While probably not realistic, I am hoping the final model will be about three million polygons. I am not completely sure if my computer can handle this, but I know if it gets much higher the chances will go down drastically.
Finally the schedule. I am trying to do this for a contest, though I do not want to sacrifice the render for finishing on time. With that in mind, I am hoping to finish one section of the building each week, which means I am already behind. Until next time,
~gunnah
16 September 2013
Roman Villa
Left is an image I was making for a competition that had so many problems I missed entering. My problem was I found this scene almost impossible to render, requiring more memory than my graphics card had and overheating my processors. The only major things stopping me from calling this completely finished are the fireflies in the courtyard, especially noticeable when zooming in. In terms of modeling, the only things I wanted to add before the contest limits hit were a shield on the dirt foreground and a few rows of grapes in the background. If I get around to upgrading my graphics card in the near future, I may look to revisit this image. Besides that, I am fairly pleased with the overall look of the image.
In other news, I had registered for a course on modeling and that is now over, so I should be posing more since I will be watching fewer tutorials in the coming weeks. Though there are two contests currently going which I have hopes of entering. This means very little progress for the game until probably late October, but I have been thinking about it more of late. Finally, I have been trying to regain access o my website, which I am looking to overhaul and use it to display some of my finished works.
Until next time,
~gunnah
In other news, I had registered for a course on modeling and that is now over, so I should be posing more since I will be watching fewer tutorials in the coming weeks. Though there are two contests currently going which I have hopes of entering. This means very little progress for the game until probably late October, but I have been thinking about it more of late. Finally, I have been trying to regain access o my website, which I am looking to overhaul and use it to display some of my finished works.
Until next time,
~gunnah
07 July 2013
Work-in-Progress: HRT (Part I)
I had been work on my wyvern, but I ran into a bit of a snag. I decided to play around trying to just sculpt the face a bit to get more accustomed with the sculpting tools and left the detail on a bit too fine. Fourteen million polygons later and my computer was trying to kill itself. I know there are ways around displaying that many polygons, but to do the whole body would probably be on a similar order of polygons. I will continue to make a decent starting base mesh for the sculpt, but there is no rush if I need to replace my computer, which I do not have the money to do, just to make the sculpt possible. I can say I learned a bit, probably most important was I need a lot more work with the sculpting tool set. Also, I know the base mesh will be extremely detailed, but for the larger detail elements, I wanted the polygons to the same size or a set amount different which I did not feel I could do through sculpting yet.
I know I berated Unity in a post about a year ago, and at the time, from first hand observation, I stand by my observations. However, it seems that Unity has overhauled their system at least once since then. While I still like Torque, I would feel remiss if I did not at least attempt to use the remodeled Unity engine. While both have their catches, I still feel I like Torque's layout better. But this is a discussion for a later time.
Now on to the post's title: the HRT. Left is the blocking out, lacking a few details I want to add but overall fairly decent. The model, just like it is, is closing in on three thousand faces. I could probably drop it to closer to 2,000 without a lot of difficulty (circular objects are the bane of low poly modeling) but I wanted to have a high enough level of polygons in the mesh t make a detailing pass easier. It is much easier to have the circles have more edges then try to add more edges at a later time.While I do not mind the main canon's shape, the side guns I feel need a bit of work yet. The other major remodel will probably be the front end engine area where I would like a lot more detail. Areas not visible but lacking at this juncture include the undercarriage (something hooking the wheels to the frame), an exhaust ( I would like pipes coming from the engine, I think it would be an interesting touch) and a rear bumper (but probably lacking in spikes).
I am not going to make any predictions since they never seem to work out. So, until next time,
~gunnah
I know I berated Unity in a post about a year ago, and at the time, from first hand observation, I stand by my observations. However, it seems that Unity has overhauled their system at least once since then. While I still like Torque, I would feel remiss if I did not at least attempt to use the remodeled Unity engine. While both have their catches, I still feel I like Torque's layout better. But this is a discussion for a later time.
Now on to the post's title: the HRT. Left is the blocking out, lacking a few details I want to add but overall fairly decent. The model, just like it is, is closing in on three thousand faces. I could probably drop it to closer to 2,000 without a lot of difficulty (circular objects are the bane of low poly modeling) but I wanted to have a high enough level of polygons in the mesh t make a detailing pass easier. It is much easier to have the circles have more edges then try to add more edges at a later time.While I do not mind the main canon's shape, the side guns I feel need a bit of work yet. The other major remodel will probably be the front end engine area where I would like a lot more detail. Areas not visible but lacking at this juncture include the undercarriage (something hooking the wheels to the frame), an exhaust ( I would like pipes coming from the engine, I think it would be an interesting touch) and a rear bumper (but probably lacking in spikes).
I am not going to make any predictions since they never seem to work out. So, until next time,
~gunnah
24 June 2013
Oops, missed a little while; Work-in-Progress: Swamp Monster (Part I)
I guess I should start off with I am not dead, just got a little busy over the last few weekends. I accomplished only a few things on existing projects, so I am not going to mention them. However, I have been keeping up with tutorials and posts about my particular modeling software and I have a few new outlooks. The first is that I want to try a sculpting project. While sculpting has very little benefit for my game itself, outside any statue models perhaps; I am hoping learning sculpting produces an interesting organic model for my portfolio. Despite the interest in trying sculpting, my impulse alone would not have driven me to start yet another project. But a few choice words in a modeling article would, and that is exactly what I found. The modeling software I use is free and attracts many people trying to learn 3D modeling. Since people with a formal education in a related field usually have access to expensive software, not mentioning companies who hire those artists, very few tend to migrate to the free program. This has resulted in a general gap between the general body of work made in the expensive programs and those made in the free programs. With the build-up out of the way, I can get to the pearl of wisdom: Separate from the crowd. Sounds simple enough, but quite a few people look only to other users of their software, ignoring the more general and higher quality 3D scene at large. This is what drove me to starting this new project. Plus the fact there is a contest for it. (I know I have a poor track record with contests, but with the length of this one, I am hoping for a little better showing.)
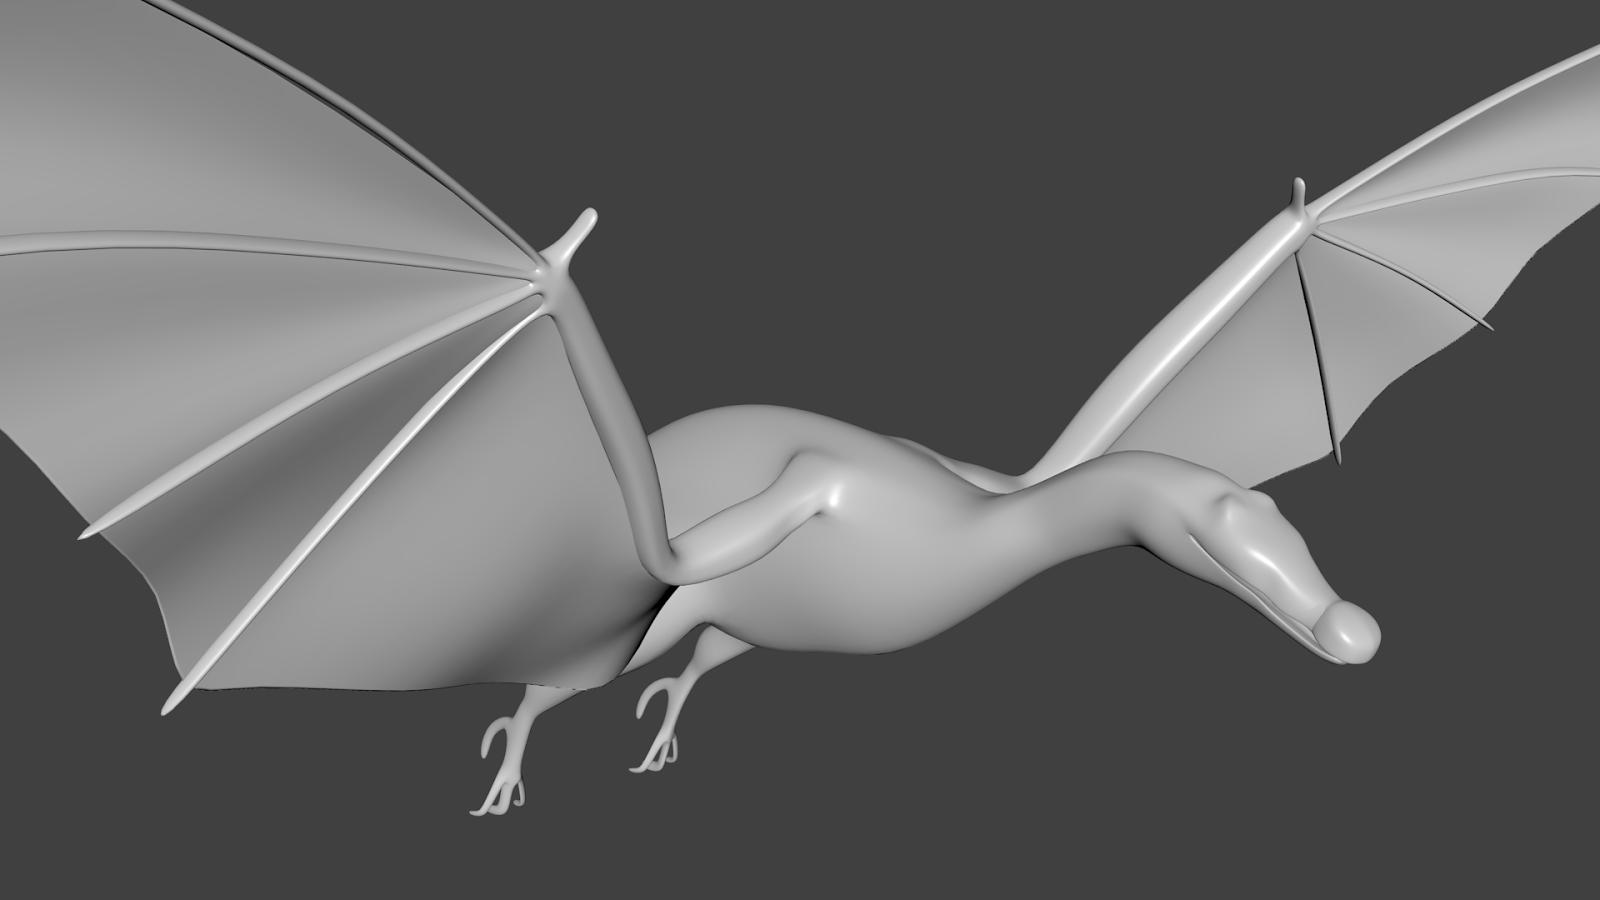
The contest is to make a swamp creature that would scare you to death. The contest is very open, it just has to be a creature that looks like it would hunt in a swamp and be able to hunt human hunters. I bean by thinking of ideas for what kinds of creatures live in a swamp and outside the crocodile could not come up with any very large creatures - most others were just vicious little ones. Then came the tough question, how to improve on a beast that pre-dates the dinosaurs? My answer: give it wings and longer legs. The legs are a by-product of needing something to manipulate a catch. Left is the very early base mesh I am using to block in my ideas. My key aspects are a crocodile-like head, bat-like wings and raptor-like claws (raptor referring to the group of birds not the dinosaur) .
With the silhouette to my liking and all the main aspects in, I decided to retopologize the mesh adding in what I am calling the mid-level details. Left is how far I have come, obviously needing quite a bit of work still with this step. My goal is to add all the teeth, spines, eyes, ears and bony bumps into the mesh before starting the sculpting process. Mostly because I think these aspects need a little more precision and would look a little odd if left to a novice sculptor. Note that I started retopologizing the arms because I felt the muscles needed were inadequately represented in he base mesh. The arms are by no means close to finished, but give a much better image of how I want the final image to look.
Left is the two above images overlaid to give a better idea of what I am trying to make. Again, living in a swamp, I am trying to make it look semi-aquatic. The only main detail missing is webbing in the talons. Once I have finished the retopologizing which may take some time while /I figure out details I want to add, I will move on to the sculpting portion. My first pass will be muscle tone in the jaw, wings and legs. My second pass will be small details like scales. Finally I am going to make an asymmetric sculpt pass to add scaring, damage to the wings, breaks in spikes or teeth. While I am not sure I will be able to get ll I want to finished by the deadline, I hope to get most of it and use the finished image as a starting point for a portfolio.
The contest is to make a swamp creature that would scare you to death. The contest is very open, it just has to be a creature that looks like it would hunt in a swamp and be able to hunt human hunters. I bean by thinking of ideas for what kinds of creatures live in a swamp and outside the crocodile could not come up with any very large creatures - most others were just vicious little ones. Then came the tough question, how to improve on a beast that pre-dates the dinosaurs? My answer: give it wings and longer legs. The legs are a by-product of needing something to manipulate a catch. Left is the very early base mesh I am using to block in my ideas. My key aspects are a crocodile-like head, bat-like wings and raptor-like claws (raptor referring to the group of birds not the dinosaur) .
With the silhouette to my liking and all the main aspects in, I decided to retopologize the mesh adding in what I am calling the mid-level details. Left is how far I have come, obviously needing quite a bit of work still with this step. My goal is to add all the teeth, spines, eyes, ears and bony bumps into the mesh before starting the sculpting process. Mostly because I think these aspects need a little more precision and would look a little odd if left to a novice sculptor. Note that I started retopologizing the arms because I felt the muscles needed were inadequately represented in he base mesh. The arms are by no means close to finished, but give a much better image of how I want the final image to look.
Left is the two above images overlaid to give a better idea of what I am trying to make. Again, living in a swamp, I am trying to make it look semi-aquatic. The only main detail missing is webbing in the talons. Once I have finished the retopologizing which may take some time while /I figure out details I want to add, I will move on to the sculpting portion. My first pass will be muscle tone in the jaw, wings and legs. My second pass will be small details like scales. Finally I am going to make an asymmetric sculpt pass to add scaring, damage to the wings, breaks in spikes or teeth. While I am not sure I will be able to get ll I want to finished by the deadline, I hope to get most of it and use the finished image as a starting point for a portfolio.
04 March 2013
Working on the Floor
Last post, I went over what was the minimum needed for me to create a level. I detailed all of the pieces and their basic function, but I do not feel I gave one in particular enough credit. The generic floor piece is one of the most important to construct for the map. Not only will it likely be by far the most used piece, it will predominantly be responsible for setting the feel of the level. Every other piece will be in one way or another a modified version of the floor piece. Even pieces like the walls, while not directly a copy like the ramp, ledge or support pieces will be, will have the general shapes similar to the floor to keep a unified feel.
With this level of importance, I do not want to rush in and take the first thing I make and run with it. Outside of missing some great ideas which may come from making multiple iterations, my main purpose is to find one that looks right while fulfilling my criteria. Since form follows function, most of my criteria are fairly easy to meet. Obviously, the science fiction look I am creating stems from the fact it is suppose to be a starship cargo hold. Intricacies and a slightly unfinished look stem from the setting also and science fiction in general. These intricacies lead to cool and interesting looking pieces (and I could continue with this train of thought, but I think I made the point, its usage dictates a certain look and a certain look makes its useable). The hard part come from my desired polygon count: one polygon or two triangles. Having an intricate and detailed piece fulfill this requirement means a heavy reliance on normal and displacement mapping. I do, however, feel this is necessary to keep the game running smoothly. I know I could do some level of detail work, making the closer planes a little more high polygon, but I have worries about seems where the levels of detail change. I have played game where their level of detail models changes too quickly and it made the game seem unpolished.
Hopefully, if things progress like they have been I will have a few more normal and displacement maps done by next week and then see how well diffuse, specular and ambient occlusion maps can fake distance the week after this. Once I have all the maps done, I will show them, detailing the highlights and short comings of each. At that point I can select one and start modifying it to make additional pieces.
Also, I know I said I was entering a contest. Unfortunately work has been picking up and there has been quite a bit of overtime, so I was not able to get close enough to finishing the entry to even show it. I may work on it later, but for now it joins my list of unfinished projects. Until next time,
~gunnah
With this level of importance, I do not want to rush in and take the first thing I make and run with it. Outside of missing some great ideas which may come from making multiple iterations, my main purpose is to find one that looks right while fulfilling my criteria. Since form follows function, most of my criteria are fairly easy to meet. Obviously, the science fiction look I am creating stems from the fact it is suppose to be a starship cargo hold. Intricacies and a slightly unfinished look stem from the setting also and science fiction in general. These intricacies lead to cool and interesting looking pieces (and I could continue with this train of thought, but I think I made the point, its usage dictates a certain look and a certain look makes its useable). The hard part come from my desired polygon count: one polygon or two triangles. Having an intricate and detailed piece fulfill this requirement means a heavy reliance on normal and displacement mapping. I do, however, feel this is necessary to keep the game running smoothly. I know I could do some level of detail work, making the closer planes a little more high polygon, but I have worries about seems where the levels of detail change. I have played game where their level of detail models changes too quickly and it made the game seem unpolished.
Hopefully, if things progress like they have been I will have a few more normal and displacement maps done by next week and then see how well diffuse, specular and ambient occlusion maps can fake distance the week after this. Once I have all the maps done, I will show them, detailing the highlights and short comings of each. At that point I can select one and start modifying it to make additional pieces.
Also, I know I said I was entering a contest. Unfortunately work has been picking up and there has been quite a bit of overtime, so I was not able to get close enough to finishing the entry to even show it. I may work on it later, but for now it joins my list of unfinished projects. Until next time,
~gunnah
25 February 2013
What is Needed to Make a Level
So I have decided to make a modular level, similar to what I had been doing with the road pieces. I looked at my ideas for levels and decided the one I could probably piece together quickest is the space ship cargo hold. So with the level picked, I had to decide dimensions. This was fairly simple since the last time I was deciding on a level to make I had a rough idea of the size. For the cargo hold, I am thinking something like a square with a side of two kilometers. This would make a four square kilometer box with twenty-five possible points of contention. While this may seem sparse, I want the game to flow in more small skirmishes than full team on team which I think this size and distribution may provide. Of course the big test will come once I get enough done to start assembling the level.
With the level picked out, the size chosen and key points selected, I then began to think of how I wanted the level to look. Since I am going for fairly quick and many of the pieces will be repeating right next to each other, I am going for a cleaner look. So the only thing left is what actually needs to be made, which I have listed at about twenty pieces. I am sure this is not a completely list as it has no unique pieces on it, but I think the main modular set will include about that many. Below is a brief listing of how those are divided.
Floor tile: one piece; probably the most repeated unit in the map.
Ledge: two pieces, either a corner or an edge; used with raised platforms mostly.
Ramp: three pieces; one to go up, one to go down, and an optional mid piece.
Supports: four pieces; a base, a top and an optional mid section as well as a whole section; these are needed not only because floating platform drive me nuts but can also provide some more covered areas.
Walls: six pieces; all are either a corner or an edge, and either a base, a top or a mid section; mostly to wall in the map and the base.
Windowed Walls: two pieces, corner or edge; I want to use these on the north and south walls to break up the way the walls look.
Note that any pieces used for flooring (floor, ledge and ramp) I want to display the current owners colors. These will be shown by lights in the floor which will change when the sector changes hands. This means each of those will need five versions of each texture (one for each team and a not captured color). I have actually started on the main floor tile and hopefully I have something to show for next time. Until then,
~gunnah
With the level picked out, the size chosen and key points selected, I then began to think of how I wanted the level to look. Since I am going for fairly quick and many of the pieces will be repeating right next to each other, I am going for a cleaner look. So the only thing left is what actually needs to be made, which I have listed at about twenty pieces. I am sure this is not a completely list as it has no unique pieces on it, but I think the main modular set will include about that many. Below is a brief listing of how those are divided.
Floor tile: one piece; probably the most repeated unit in the map.
Ledge: two pieces, either a corner or an edge; used with raised platforms mostly.
Ramp: three pieces; one to go up, one to go down, and an optional mid piece.
Supports: four pieces; a base, a top and an optional mid section as well as a whole section; these are needed not only because floating platform drive me nuts but can also provide some more covered areas.
Walls: six pieces; all are either a corner or an edge, and either a base, a top or a mid section; mostly to wall in the map and the base.
Windowed Walls: two pieces, corner or edge; I want to use these on the north and south walls to break up the way the walls look.
Note that any pieces used for flooring (floor, ledge and ramp) I want to display the current owners colors. These will be shown by lights in the floor which will change when the sector changes hands. This means each of those will need five versions of each texture (one for each team and a not captured color). I have actually started on the main floor tile and hopefully I have something to show for next time. Until then,
~gunnah
18 February 2013
Another Week Already in the Books
So I started the week with two models basically done with being blocked out. From there I decided if I worked on one model, it may get to completion faster than working on both at once like I normally do. While working on the one, which I have called Scorpio, I have though of one other design which I have yet to block out. None of these models are in any condition to be shown yet. With any luck, the first concept will be up about middle of next month, for reasons I will discuss shortly. For my first demo, I am hoping to have four tanks available to chose from, so this is a priority.
Now, for what is going to delay my tank modeling process: a contest. I think my skill is decent, though nowhere near where I would like it to be, but I never have any deadlines. Should I say something and the date passes like it always does, I move on to the next item on my to do list. I am hoping entering the contest will give me a little more of a push to get stuff done. The post after I submit my entry, I will put it on display. I am hoping it turns out as good as I have envisioned.
Just a final note, I have made some minor changes to the log's layout. Biggest of these includes a list of tanks and their current stage of development. I am hoping that keeps me motivated. Until next time,
~gunnah
Now, for what is going to delay my tank modeling process: a contest. I think my skill is decent, though nowhere near where I would like it to be, but I never have any deadlines. Should I say something and the date passes like it always does, I move on to the next item on my to do list. I am hoping entering the contest will give me a little more of a push to get stuff done. The post after I submit my entry, I will put it on display. I am hoping it turns out as good as I have envisioned.
Just a final note, I have made some minor changes to the log's layout. Biggest of these includes a list of tanks and their current stage of development. I am hoping that keeps me motivated. Until next time,
~gunnah
11 February 2013
Creative Flow
So recently I have been learning the process of bringing something from an idea to a full fleshed out 3D model. It seems most people start with a series of sketches and then make a high polygon count block model from the sketch. However, since I am still getting adjusted to digital drawing - I have had a tablet for a little while now, but have not really had much of an excuse to use it - I have modified the process slightly and will describe it below.
Concept Block Out
This is an extremely low poly version of the models I want to make. The real purpose of these models is to figure out what are the main pieces I want in the model and what proportion each piece should have to the others. These look like a lot of my early work since they are primarily primitives and are nothing to show, unfortunately.
High Poly Concept
Once the block out is finished and I feel there are no other major pieces of the model to add, I will set it aside for when I start this modeling phase. Here is when I take the hideous sets of cubes and cylinders I am calling models and turning them into showing I can show. Most items will be blocked out as separate objects. Minor details will be omitted, but I will probably share these images, if not the full turntable.
High Poly Model
At this point I go through and start examining the model's topology. In addition to topology fixes, and final tweaking to the model will be done. Once everything is where I want it, I will add in details like bolt and the like, giving the model its final looks.
Textured Model
Once everything is set in just the right place and every bolt is where it belongs, I will texture the model. This process includes the diffuse, specular and occlusion maps.This process is likely to start with piece by piece texturing and then baking each piece onto a final UV map.
Low Poly Model
With everything set and the model looking exactly how it will in game, hopefully, the process of removing extra baggage starts. The goal at this stage is to get the model to have as few polygons as possible while retaining the basic shape.Once set, the high polygon model will have it's normals baked on to the low poly model. The model will then be rigged, a series of animations sequences created and exported for used in whatever engine I have selected at the time.
Hopefully, this will shed some light on what I will be doing in the upcoming weeks. My goal is to get four tanks for my initial release to demonstrate the weapon selection screen. Until next time,
~gunnah
Concept Block Out
This is an extremely low poly version of the models I want to make. The real purpose of these models is to figure out what are the main pieces I want in the model and what proportion each piece should have to the others. These look like a lot of my early work since they are primarily primitives and are nothing to show, unfortunately.
High Poly Concept
Once the block out is finished and I feel there are no other major pieces of the model to add, I will set it aside for when I start this modeling phase. Here is when I take the hideous sets of cubes and cylinders I am calling models and turning them into showing I can show. Most items will be blocked out as separate objects. Minor details will be omitted, but I will probably share these images, if not the full turntable.
High Poly Model
At this point I go through and start examining the model's topology. In addition to topology fixes, and final tweaking to the model will be done. Once everything is where I want it, I will add in details like bolt and the like, giving the model its final looks.
Textured Model
Once everything is set in just the right place and every bolt is where it belongs, I will texture the model. This process includes the diffuse, specular and occlusion maps.This process is likely to start with piece by piece texturing and then baking each piece onto a final UV map.
Low Poly Model
With everything set and the model looking exactly how it will in game, hopefully, the process of removing extra baggage starts. The goal at this stage is to get the model to have as few polygons as possible while retaining the basic shape.Once set, the high polygon model will have it's normals baked on to the low poly model. The model will then be rigged, a series of animations sequences created and exported for used in whatever engine I have selected at the time.
Hopefully, this will shed some light on what I will be doing in the upcoming weeks. My goal is to get four tanks for my initial release to demonstrate the weapon selection screen. Until next time,
~gunnah
18 November 2012
Rough Week
During the previous week I got nothing done just like I was guessing I would. My day was pretty much get home, go to sleep, get ready for work, leave, and then work all day. Saturday I had a test in the morning, so any free time I had during the previous week was cramming just that little extra bit.
Now onto what I actually did relating to the project: Not much. I know my scene is almost finished and I probably should have just worked on that, but I kind of wanted a bit of a break. Also, I am now up in the air about what kind of floodlight I am adding to the scene as I got a different idea for what I think it should look like. Once the lights are in the actual modeling and texturing end should be finished, save for any details which I do not like after looking at the scene as a whole - like the post texturing. Then it is just a matter of post-processing to give it the right feel and I should finally have something done, albeit not actually part of the project proper.
Now, enough about what I did not do. I have begun looking again at engines. Do not get me wrong, so far UDK is looking the most likely, but I want to get a feel for some other environments before settling on any one engine. I was actually hoping to have a review of the engine ready for this post, but it is taking me a while to get it set up. Right now I am looking at the Torque 3D engine, which is nice because it is an open source engine. It looks similar to UDK, but does not have the fee UDK does which is a plus for someone who is completely broke.
Working a bit of overtime this week and then there is the holiday at the end of the week, so I may or may not post on Friday. Until next time,
~gunnah
Now onto what I actually did relating to the project: Not much. I know my scene is almost finished and I probably should have just worked on that, but I kind of wanted a bit of a break. Also, I am now up in the air about what kind of floodlight I am adding to the scene as I got a different idea for what I think it should look like. Once the lights are in the actual modeling and texturing end should be finished, save for any details which I do not like after looking at the scene as a whole - like the post texturing. Then it is just a matter of post-processing to give it the right feel and I should finally have something done, albeit not actually part of the project proper.
Now, enough about what I did not do. I have begun looking again at engines. Do not get me wrong, so far UDK is looking the most likely, but I want to get a feel for some other environments before settling on any one engine. I was actually hoping to have a review of the engine ready for this post, but it is taking me a while to get it set up. Right now I am looking at the Torque 3D engine, which is nice because it is an open source engine. It looks similar to UDK, but does not have the fee UDK does which is a plus for someone who is completely broke.
Working a bit of overtime this week and then there is the holiday at the end of the week, so I may or may not post on Friday. Until next time,
~gunnah
05 November 2012
Abandoned Building Scene (Part III)
While I probably should have finished the modeling end of this over the previous weekend, I hit a few set backs. Even though I know I should save more often, normally it does not really matter. For this project, it has bit me twice, but each time I think I get a better result. When I initially lost power due ti the hurricane, I lost the very basic texturing job I did no the building. Yesterday, while trying to add a sky background, it crashed again, again loosing the texturing I did no the building - yes, I saved the image of the texturing but forgot to save the model itself. This time, I think it came out much more interesting, being more patches of scattered moss than a bad drip pattern. Also, I did each area of the building with a different material, just to get it to look a little nicer and decrease any more blatant repetition.
Now for what is new besides the re-texturing of the building. Stairs are slightly reformed, giving a slightly more interesting look than before, and are textured which made the last render look bad. The sky has been added to this shot, and I think it sets the scene off better, just comparing the brightness of the flooring. I have scattered a few little extras around in the shape of metal drums, though I have not gotten to making the palettes yet. I made some barbed wire for the wall, but I think an post or something on the corners is needed to anchor it a little better, it may also need a few posts to give it just a little more realism. I have started working on the lights - a combination of floodlights and siren - though they are not in a shape which I feel is presentable. Then the only modeling left is the debris, which I am really giving a decent bit of thought trying to think of plausible bits to be scattered around to really make the scene. Then the only objects left to model are either casting shadows in the foreground behind the camera or in the distance breaking up the horizon.
While that probably seems like a lot, the overall number of objects is fairly small and now more for detail - except the lights which will add lighting also - which means the modeling and texturing portion of this is actually at a foreseeable end, though not here quite yet. Again, once the modeling and texturing is done, the final lighting is set up to get all of the shadows and detail out of the scene and then it is on to the rendering. The final render will have a bit of post-processing involved since I want the distant wall to be almost behind a little mist. Besides that, I will probably only do a small bit of light enhancing. I have not done anything with the end of 3D modeling - I have been more focused on the modeling.texturing since those are the important ends to game design - and my projects usually never get that far anyway.
Well that is probably enough to poor anyone, so I will leave whatever else somes into my head for next time,
~gunnah.
Now for what is new besides the re-texturing of the building. Stairs are slightly reformed, giving a slightly more interesting look than before, and are textured which made the last render look bad. The sky has been added to this shot, and I think it sets the scene off better, just comparing the brightness of the flooring. I have scattered a few little extras around in the shape of metal drums, though I have not gotten to making the palettes yet. I made some barbed wire for the wall, but I think an post or something on the corners is needed to anchor it a little better, it may also need a few posts to give it just a little more realism. I have started working on the lights - a combination of floodlights and siren - though they are not in a shape which I feel is presentable. Then the only modeling left is the debris, which I am really giving a decent bit of thought trying to think of plausible bits to be scattered around to really make the scene. Then the only objects left to model are either casting shadows in the foreground behind the camera or in the distance breaking up the horizon.
While that probably seems like a lot, the overall number of objects is fairly small and now more for detail - except the lights which will add lighting also - which means the modeling and texturing portion of this is actually at a foreseeable end, though not here quite yet. Again, once the modeling and texturing is done, the final lighting is set up to get all of the shadows and detail out of the scene and then it is on to the rendering. The final render will have a bit of post-processing involved since I want the distant wall to be almost behind a little mist. Besides that, I will probably only do a small bit of light enhancing. I have not done anything with the end of 3D modeling - I have been more focused on the modeling.texturing since those are the important ends to game design - and my projects usually never get that far anyway.
Well that is probably enough to poor anyone, so I will leave whatever else somes into my head for next time,
~gunnah.
03 November 2012
Abandoned Building Scene (Part II)
Despite mother nature's best effort to stop me from working on this, I did manage to get a little done. Granted, I still need to texture the stairs which are a white sore in the middle of a decent job, I think, so far. I am going to stretch the overgrowth a little so it is not as noticeable, though that is a quick trick. Bedsides that, I feel fairly happy with what I have to present, so I will move forward. The next part will be scattered debris, a few palettes, and a fifty-five gallon drum or two. Then comes with ivy which I want overgrowing the back wall and right wall, as well as maybe one running down the railing. But that is still pretty far off, so I do not want to get ahead of myself. Beyond that I want to make a background object or two, perhaps an object behind the camera to cast a shadow and then set an overcast sky. To wrap up the image, I would like to add a few lights around the scene, just to touch off some of the more intricate work. And then it is just a matter of post-production to add that little extra to the scene, of course this is way off in the future.
Besides the obvious texturing changes from last time, there were a few scene changes. I was talking about changing the width of the yard, I think I am going to leave it since I accomplished something similar by changing the cameras height and rotation. The doors are also a new addition. Finally, I added a temporary light so that the detail being added to the scene was noticeable This will be removed once I add the other lights around the scene - perhaps earlier to just get a feel where the others lights will be needed.
For those interested, I think I mentioned I was bracing for the hurricane in the previous post. Since I am making this post, it is obvious nothing serious happened. Lost power for a dat and a half, internet for three days and television for four. Everything now seems to be in working order and hopefully with the little downtime I have I can rush through some of those to-dos I still have with this scene. Until next time,
~gunnah
Besides the obvious texturing changes from last time, there were a few scene changes. I was talking about changing the width of the yard, I think I am going to leave it since I accomplished something similar by changing the cameras height and rotation. The doors are also a new addition. Finally, I added a temporary light so that the detail being added to the scene was noticeable This will be removed once I add the other lights around the scene - perhaps earlier to just get a feel where the others lights will be needed.
For those interested, I think I mentioned I was bracing for the hurricane in the previous post. Since I am making this post, it is obvious nothing serious happened. Lost power for a dat and a half, internet for three days and television for four. Everything now seems to be in working order and hopefully with the little downtime I have I can rush through some of those to-dos I still have with this scene. Until next time,
~gunnah
08 October 2012
Work in Progress: Motor Pool Garage (Part I)
I am not sure why, but after my last post, I felt inspired to make the garage for the motor pool. I may use this as a generic garage and place it in spots around the map, since it would make more sense then some of the other ideas I had about reloading locations. I apologize for the quality of the render, for some reason it would not render in the image but the object worked fine in the work area, so this is a screenshot of the work area set as close to render settings as possible. The model itself is near done as after getting the shape I wanted, I cut the number of face on the main structure from over six-hundred to just under two-hundred, reducing the number of triangles by about one-thousand. Most of the other parts will not reduce as nicely since their model is about as low poly count as possible already. For the modeling part, I still need to add two more doors, a front door which will be mostly glass and a door between the shop and garage area which will be wooden. I would also like to add a satellite dish to the roof and a small sign across the top of the shop and between the garage doors to show which team has control over the garage. Additional items may include things inside the shop and garage - desk, computer, chairs in the shop and tools and a pair of car lifts in the garage - though these are detail and can be added much later, since they are really unnecessary polygons for the overall model itself.. Once those are in, work on the UV layouts can begin, though these show not take that much time as most objects are just cubes and the structure has been dramatically cut down in polygon count. Then I can begin texturing the model, which will probably be a clean concrete face for the outside structure, though I may do one a little more broken down for an image render, and a little dirtier on the inside. Window and door frames will be wood, not sure if I want to make it look painted or not though, and the glass will be dirty for both the image render and game model. Once all the the texturing is done, all I need to do is make a handful of collision boxes and the object will be ready to export.
And I went and got ahead of myself again. Hopefully, I will have the modeling end finished off by the end of the week and figure out why it did not render nicely. So, until then,
~gunnah
And I went and got ahead of myself again. Hopefully, I will have the modeling end finished off by the end of the week and figure out why it did not render nicely. So, until then,
~gunnah
06 October 2012
Rusted I-Beam
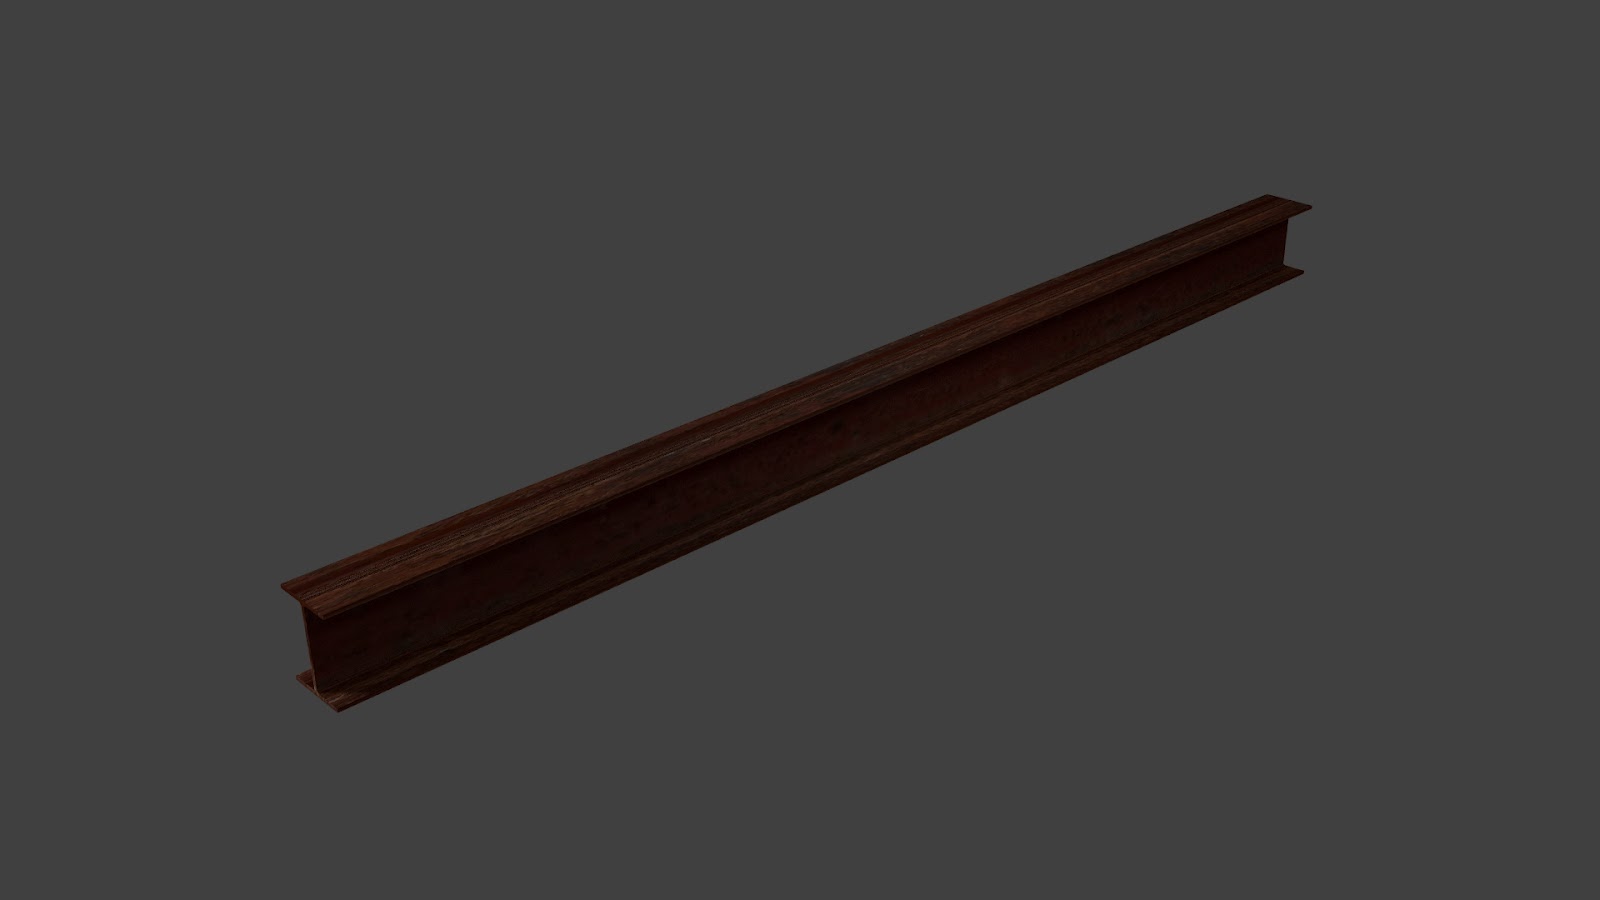
I know it does not sound like much but the only thing I finished this week was the I-beam to the left. I watched several interesting tutorials, particularly the last one on creating a post-apocalyptic effect, may prove fairly useful.As far as where I am headed from here, again, I would like to get some of those scenes finished before I begin the majority of work on this project. I know that is a bit of a delay, but I feel they would be something useful for me to complete. Once those are finished, or while I am working on them depending on how time flows, I would like to get several of the main buildings in my military base finished. I will probably start with the hangar and garage.and then figure out where to focus on the rest of the map.
Now for me to pick apart the i-beam. The model itself I feel came out very nice and at 78 faces should not break anyone's computer. While I could construct an even lower polygon count i-beam - this one has some smoothing where the vertical piece meets each of the horizontal pieces - that is not a big worry at the moment, though might become one if my scenes get too detailed. What real bugs me is the texturing. Overall it is not awful, though would probably work nicer if the bump map was working as rust does not come off as flat as the model looks. But what is broken is the UV layout, which I realize means that even the nicest texture will not come out that great. For some reason the program insists on making each of the non-end-cap faces the same size on the UV map which causes the texture to stretch in tight spots, though it lays about how I want it to in the larger areas. Once I get the UV map to lay right, I can fit the texture again and see if that also needs work. Until next time,
~gunnah
Now for me to pick apart the i-beam. The model itself I feel came out very nice and at 78 faces should not break anyone's computer. While I could construct an even lower polygon count i-beam - this one has some smoothing where the vertical piece meets each of the horizontal pieces - that is not a big worry at the moment, though might become one if my scenes get too detailed. What real bugs me is the texturing. Overall it is not awful, though would probably work nicer if the bump map was working as rust does not come off as flat as the model looks. But what is broken is the UV layout, which I realize means that even the nicest texture will not come out that great. For some reason the program insists on making each of the non-end-cap faces the same size on the UV map which causes the texture to stretch in tight spots, though it lays about how I want it to in the larger areas. Once I get the UV map to lay right, I can fit the texture again and see if that also needs work. Until next time,
~gunnah
12 August 2012
I really need to find where my weekends go
So another weekend passed and I am left trying t figure out what I did during it. I suppose I should be use to very short weekends by now, but it never ceases to amaze me just how fast they fly by when the week seems to drag on forever. But I always have been bad at judging time and that is not what this post is about despite the title.
I have begun work on a little distraction, nothing big just something to have a bit of fun with, though I am leaving it at that until I have something to show in case that project goes nowhere. I have also began a game-relevant tutorial which I am hoping will make one or more of my meshes when all is said and done. Again, I will have more when the project is further along, but that should be within the next week.
And finally, I am looking at engines again. I found one that has a royalty-free license until distribution, so I will write more about that once I get it installed and running. Hope every had a good weekend,
~gunnah
I have begun work on a little distraction, nothing big just something to have a bit of fun with, though I am leaving it at that until I have something to show in case that project goes nowhere. I have also began a game-relevant tutorial which I am hoping will make one or more of my meshes when all is said and done. Again, I will have more when the project is further along, but that should be within the next week.
And finally, I am looking at engines again. I found one that has a royalty-free license until distribution, so I will write more about that once I get it installed and running. Hope every had a good weekend,
~gunnah
10 August 2012
Learning more
While I am hoping to make a piece or two for the base level, I am not sure ho well that is going to work. Not for lack of will, but my weekends seem to pass real quick. Another aspect which may hold up making these little models is the need to do tutorials. While I do not mean tutorials are a requirement for everything, Completing a handful would make me more comfortable with the overall layout. Additionally, do a few tutorials may point out ways which I did not even think of to do these models.
Have a good weekend,
~gunnah
Have a good weekend,
~gunnah
05 August 2012
Hidden Progress
Just as the post name states, I have nothing to actually show for this post. Perhaps later in the week I will have more pretty pictures of tutorials I completed. Well, I suppose the place to start is where I left off last post: the high-detail, low-poly plane. One of the biggest problems I am having with the second part, I finished the first already, is I want to use a completely different set of software than the tutorial. Though I have tried the image editing software the tutorial uses, the price tag is very high, so I found a free alternative. However, not everything lines up perfectly, and I can say you do get what you pay for in this circumstance. That being said, I am going to continue with the free image editing software for the time being until I can actually afford the pricey alternative Another problem I found was the tutorial does not use UDK like I though but rather Unity, something I hope never to have to touch. So when I get to it, I will try to export it to UDK.
Now that looks like I did not do much, and that would be fairly truthful, at least for that tutorial. What I did do was get familiar with the new 3D modeling software, which is much like the debate I am having over which image editing software to use. Though in this debate the new, free software actually has a few advantages over the old software. One of the big ones is that the software will generate a UV map and while this does not sound like much, that is actually quite nice compared to making one in the old software. Note that while I have not actually unwrapped a UV on one of my models, I watched two tutorials on how to do so and practiced on a cube. One little annoyance I have is that scaled geometry keeps the UV points relative to their position before scaling. That may sound weird but here is what I mean: Say you have a cube and unwrap it, you would get the normal t shape. But let us say you did not unwrap it and instead scaled the Y and Z dimensions by one quarter and the X by three, leading to something that would be like a 6" by 6" by 6' piece of lumber (I was trying to make a pallet and that was to be the middle beams). I was expecting the unwrap to produce four rectangles and two square, but what ended up happening is the UV map for the cube was generated. With a bit of work, I manage to determine it was the scaling that did that, since moving the vertices to the same locations unwrapped in the proper form.
One of the bug advantages, since the new 3D modeling software is open source, the interface to export to other software is very open. So exporting to UDK only required a small python script. I watched several tutorials on how to move models from the 3D modeler to UDK so they would have the proper material, collision boxes and light maps. This just means that if I do decide on UDK, moving the models to it would be very easy, at least that is what it looked like. I will probably make my final decision about what software I am using at the same time, buying whatever licenses at that time. Currently I am looking into several engines, though I only have two installed at the moment, a few image editing software since I am not sure I completely like the free one I just started using, and a few 3D modeling programs, but mostly the two I have been suing, trying to decide if it is worth putting that much into the project or to just use the free alternative. Well, probably nothing definitive on those choices any time soon, so until the end of the week,
~gunnah
Now that looks like I did not do much, and that would be fairly truthful, at least for that tutorial. What I did do was get familiar with the new 3D modeling software, which is much like the debate I am having over which image editing software to use. Though in this debate the new, free software actually has a few advantages over the old software. One of the big ones is that the software will generate a UV map and while this does not sound like much, that is actually quite nice compared to making one in the old software. Note that while I have not actually unwrapped a UV on one of my models, I watched two tutorials on how to do so and practiced on a cube. One little annoyance I have is that scaled geometry keeps the UV points relative to their position before scaling. That may sound weird but here is what I mean: Say you have a cube and unwrap it, you would get the normal t shape. But let us say you did not unwrap it and instead scaled the Y and Z dimensions by one quarter and the X by three, leading to something that would be like a 6" by 6" by 6' piece of lumber (I was trying to make a pallet and that was to be the middle beams). I was expecting the unwrap to produce four rectangles and two square, but what ended up happening is the UV map for the cube was generated. With a bit of work, I manage to determine it was the scaling that did that, since moving the vertices to the same locations unwrapped in the proper form.
One of the bug advantages, since the new 3D modeling software is open source, the interface to export to other software is very open. So exporting to UDK only required a small python script. I watched several tutorials on how to move models from the 3D modeler to UDK so they would have the proper material, collision boxes and light maps. This just means that if I do decide on UDK, moving the models to it would be very easy, at least that is what it looked like. I will probably make my final decision about what software I am using at the same time, buying whatever licenses at that time. Currently I am looking into several engines, though I only have two installed at the moment, a few image editing software since I am not sure I completely like the free one I just started using, and a few 3D modeling programs, but mostly the two I have been suing, trying to decide if it is worth putting that much into the project or to just use the free alternative. Well, probably nothing definitive on those choices any time soon, so until the end of the week,
~gunnah
28 July 2012
Learning Curve
So, like I posted earlier, I am trying to learn a second 3D modeling program. Not really because I am unhappy with what I am using or anything like that, I have found the results produce by the program to be superb so far. I want to make myself more versatile. The more programs I can use, the easier it would be to convince someone I know what I am doing. Unfortunately for me, when they build 3D modeling programs, they build from the ground up. Now this is great since it produces a wide array of programs but it means that each has a bit of a learning curve for the UI. With that said, I am probably going to go back to focusing on the well animation for the time being. Now, that being said, I am going to continue working on the new modeling software, just no like I did over the previous week. Unfortunately after a week, I have nothing to show, but I will do a tutorial or two in a few weeks to show off how well I have learned the new program.
~gunnah
~gunnah
22 July 2012
Work in Progress: Well Scene Animation (Part IV)
![]() |
| The hand before bending |
![]() |
| The hand with the lantern not scaled down |
![]() |
| Hand with scaled lantern |
![]() |
| The hands holding the lanterns in the well scene |
~gunnah
Subscribe to:
Posts (Atom)