30 September 2013

Work-in-Progress: Cathedral (Flying Buttress Part II)

So, I did not get much more of the modeling end done this time around.  I had really been hoping to be further along with that aspect of the project, however, I did make progress.  Left is the textured model of the Flying Buttress.  Obvious changes including fixing the lighting and adding a ground plane.  Also, I changed the angle from which the render was taken.  I like this angle since it gives a sense of how truly massive this spire is suppose to be (the camera is now at the approximate height of an average human head).  I started beveling some of the spire, but I cannot see it enough to justify the increase in polygon count.  Finally, for the materials, I am happy with most.  There are a few spots with the one material which look overblown and I am going to need to find some way to fix those spots, but overall I think it came out decent.  I am unlikely to post another picture of the buttress since any further changes are going to be very minor.  Hopefully next time I post a buttress it will be in a full cathedral render.  Next up, the front doors of the building leading into the front two spires.  This building has three spires, two in the front and one where the side wings and main hall meet.  I do not know if I will get to that spire which is significantly smaller and from this angle it may not even be visible..  Until next time,
~gunnah

23 September 2013

Work-in-Progress: Cathedral (Flying Buttress Part I)

To challenge myself to bring my modeling to a new level, I have picked to model something that is probably at the limit of my modeling skills: the Gothic Cathedral.  I have always found these structures to be very impressive, but what I feel is unique is the high level of detail on the exterior of the building worked into the stone.  So far I have made the most repeated unit of the cathedral, the flying buttress.  The model, not textured, is to the right, though the image is slightly warped just from the scale of the model.  I am making the model in real units and the top of the highest cross on the buttress is just over seventy meters tall.  I feel fairly pleased with how the model came out, though I want to texture it before I put it on a forum or two for critiques.  Hopefully, I can get the textures done fairly quickly, though there are quite a few pieces to this model and that is likely to slow down the overall speed.  My only concern is the amount of memory it is going to take to render the overall scene.  This model alone has about 125,000 polygons and is going to be repeated quite a few times around the finished model.  Of course I am going to try every possible way to cut back, especially when putting together the final model, but for the level of detail in this style of building, I needed that many polygons.  There are section I would have used more, but I had to cut back, trying to remember objects a few centimeters in size are unlikely to even be noticeable in the final render.

Once this section is done, I have broken down the rest of the building.  The doors will be next and while not especially difficult, they do have sculptures all around which means a high polygon count for them also.  Then comes the spires, one of the defining aspects of this kind of building.  While the doors will likely have a higher polygon count, I know I will need to devout a sizable number to get the overall shape, even if I am not going for an excessively high level of detail.  The spires also have several sculptures, most notably the gargoyles which stand sentinel over the building.  Finally comes the building of the cathedral itself.  This will be of moderate polygon count since most of the detail is handled in one of the other pieces, but the large amount of stained glass will eat up polygons.  While probably not realistic, I am hoping the final model will be about three million polygons.  I am not completely sure if my computer can handle this, but I know if it gets much higher the chances will go down drastically.

Finally the schedule.  I am trying to do this for a contest, though I do not want to sacrifice the render for finishing on time.  With that in mind, I am hoping to finish one section of the building each week, which means I am already behind.  Until next time,
~gunnah

16 September 2013

Roman Villa

Left is an image I was making for a competition that had so many problems I missed entering.  My problem was I found this scene almost impossible to render, requiring more memory than my graphics card had and overheating my processors.  The only major things stopping me from calling this completely finished are the fireflies in the courtyard, especially noticeable when zooming in.  In terms of modeling, the only things I wanted to add before the contest limits hit were a shield on the dirt foreground and a few rows of grapes in the background.  If I get around to upgrading my graphics card in the near future, I may look to revisit this image.  Besides that, I am fairly pleased with the overall look of the image.

In other news, I had registered for a course on modeling and that is now over, so I should be posing more since I will be watching fewer tutorials in the coming weeks.  Though there are two contests currently going which I have hopes of entering.  This means very little progress for the game until probably late October, but I have been thinking about it more of late.  Finally, I have been trying to regain access o my website, which I am looking to overhaul and use it to display some of my finished works.

Until next time,
~gunnah

11 August 2013

Work-in-Progress: Pipe Set (Part I)

While fooling around with an idea for a scene, I started making a bunch of pipes.  At first it was just to fill up space on an empty wall, but soon I found a need to add more and more detail to these pipes.  After fooling with that for a while, I soon decided that it would be interesting to get actual measurements for the pipes, adding a bit more realism to the scene.  In the course of my journey looking for various pipe radii, I happened upon set of pipe models for sale.  While they did not interest me, I got to thinking that a reusable set of pipes could be very handy.  Once created the set could have several different skins making them useful for a variety of tasks.  A super clean set could be used in the cargo hold level, a slightly worn set could be used in the suburbia level, a rusty set for more of an abandoned industrial or military complex level.

So what is needed to make a pipe set?  I am starting with several straight pieces, an elbow, a t-intersection, a pipe cap, a few varieties of valves, a few varieties of meters, as well as some level specific large sized models like pumps, generators, fuel containers and the like.  Left is the set I have currently finished - a straight 10 and 20 cm and a 5 cm elbow - and an asphalt material on which I am working.  These are my high polygon models, not textured.  These have a 5 cm outer radius (just under 2 inches for those unfamiliar with metric) and are in metric because of the ease of scaling up and down.

These three cylinders obviously did not take a month to do.  In my silence I have been learning thing like architectural visualization and concept art creation methods.  I do not have much to show for these topics, but I will hopefully have a few images by year end.  If I could get some money, I have been looking at hardware and software I would like to get.  Most of that, at least for the time being, is a pipe dream, but it gives me something to eventually shoot for.  And finally, I got around to looking at Art School.  I only looked at one, and it is unlikely I could afford it any time soon, plus as of the moment I do not have a portfolio, but I do think it would be fun.  Not that I am sure it is necessary or the one I looked at is where I would go, but I did get an idea of pricing and entrance requirements.

Hopefully it does not take me as long to get back here for my next post and I have something even better to show off.  Until then,
~gunnah

07 July 2013

Work-in-Progress: HRT (Part I)

I had been work on my wyvern, but I ran into a bit of a snag.  I decided to play around trying to just sculpt the face a bit to get more accustomed with the sculpting tools and left the detail on a bit too fine.  Fourteen million polygons later and my computer was trying to kill itself.  I know there are ways around displaying that many polygons, but to do the whole body would probably be on a similar order of polygons.  I will continue to make a decent starting base mesh for the sculpt, but there is no rush if I need to replace my computer, which I do not have the money to do, just to make the sculpt possible.  I can say I learned a bit, probably most important was I need a lot more work with the sculpting tool set.  Also, I know the base mesh will be extremely detailed, but for the larger detail elements, I wanted the polygons to the same size or a set amount different which I did not feel I could do through sculpting yet.

I know I berated Unity in a post about a year ago, and at the time, from first hand observation, I stand by my observations.  However, it seems that Unity has overhauled their system at least once since then.  While I still like Torque, I would feel remiss if I did not at least attempt to use the remodeled Unity engine.  While both have their catches, I still feel I like Torque's layout better.  But this is a discussion for a later time.

Now on to the post's title: the HRT.  Left is the blocking out, lacking a few details I want to add but overall fairly decent.  The model, just like it is, is closing in on three thousand faces.  I could probably drop it to closer to 2,000 without a lot of difficulty (circular objects are the bane of low poly modeling) but I wanted to have a high enough level of polygons in the mesh t make a detailing pass easier.  It is much easier to have the circles have more edges then try to add more edges at a later time.While I do not mind the main canon's shape, the side guns I feel need a bit of work yet.  The other major remodel will probably be the front end engine area where I would like a lot more detail.  Areas not visible but lacking at this juncture include the undercarriage (something hooking the wheels to the frame), an exhaust ( I would like pipes coming from the engine, I think it would be an interesting touch) and a rear bumper (but probably lacking in spikes).

I am not going to make any predictions since they never seem to work out.  So, until next time,
~gunnah

30 June 2013

Work-in-Progress: Swamp Monster (Part II)

Not much done this week.  I am almost done with retopolizing the feet, as seen left.  I am not completely happy with the volume, but I will fix that with one of the later sculpting passes.  Hopefully this retopologizing and adding detail picks up this week since work is changing shifts and I should be able to allot a little more time during the week.  With any luck I will finish the legs and move on to other sections, hopefully adding a little more detail, making it easier to connect the dots instead of just remaking the base mesh with a much higher polygon count.  Until next time,
~gunnah

24 June 2013

Oops, missed a little while; Work-in-Progress: Swamp Monster (Part I)

I guess I should start off with I am not dead, just got a little busy over the last few weekends.  I accomplished only a few things on existing projects, so I am not going to mention them.  However, I have been keeping up with tutorials and posts about my particular modeling software and I have a few new outlooks.  The first is that I want to try a sculpting project.  While sculpting has very little benefit for my game itself, outside any statue models perhaps; I am hoping learning sculpting produces an interesting organic model for my portfolio.  Despite the interest in trying sculpting, my impulse alone would not have driven me to start yet another project.  But a few choice words in a modeling article would, and that is exactly what I found.  The modeling software I use is free and attracts many people trying to learn 3D modeling.  Since people with a formal education in a related field usually have access to expensive software, not mentioning companies who hire those artists, very few tend to migrate to the free program.  This has resulted in a general gap between the general body of work made in the expensive programs and those made in the free programs.  With the build-up out of the way, I can get to the pearl of wisdom: Separate from the crowd.  Sounds simple enough, but quite a few people look only to other users of their software, ignoring the more general and higher quality 3D scene at large.  This is what drove me to starting this new project.  Plus the fact there is a contest for it.  (I know I have a poor track record with contests, but with the length of this one, I am hoping for a little better showing.)
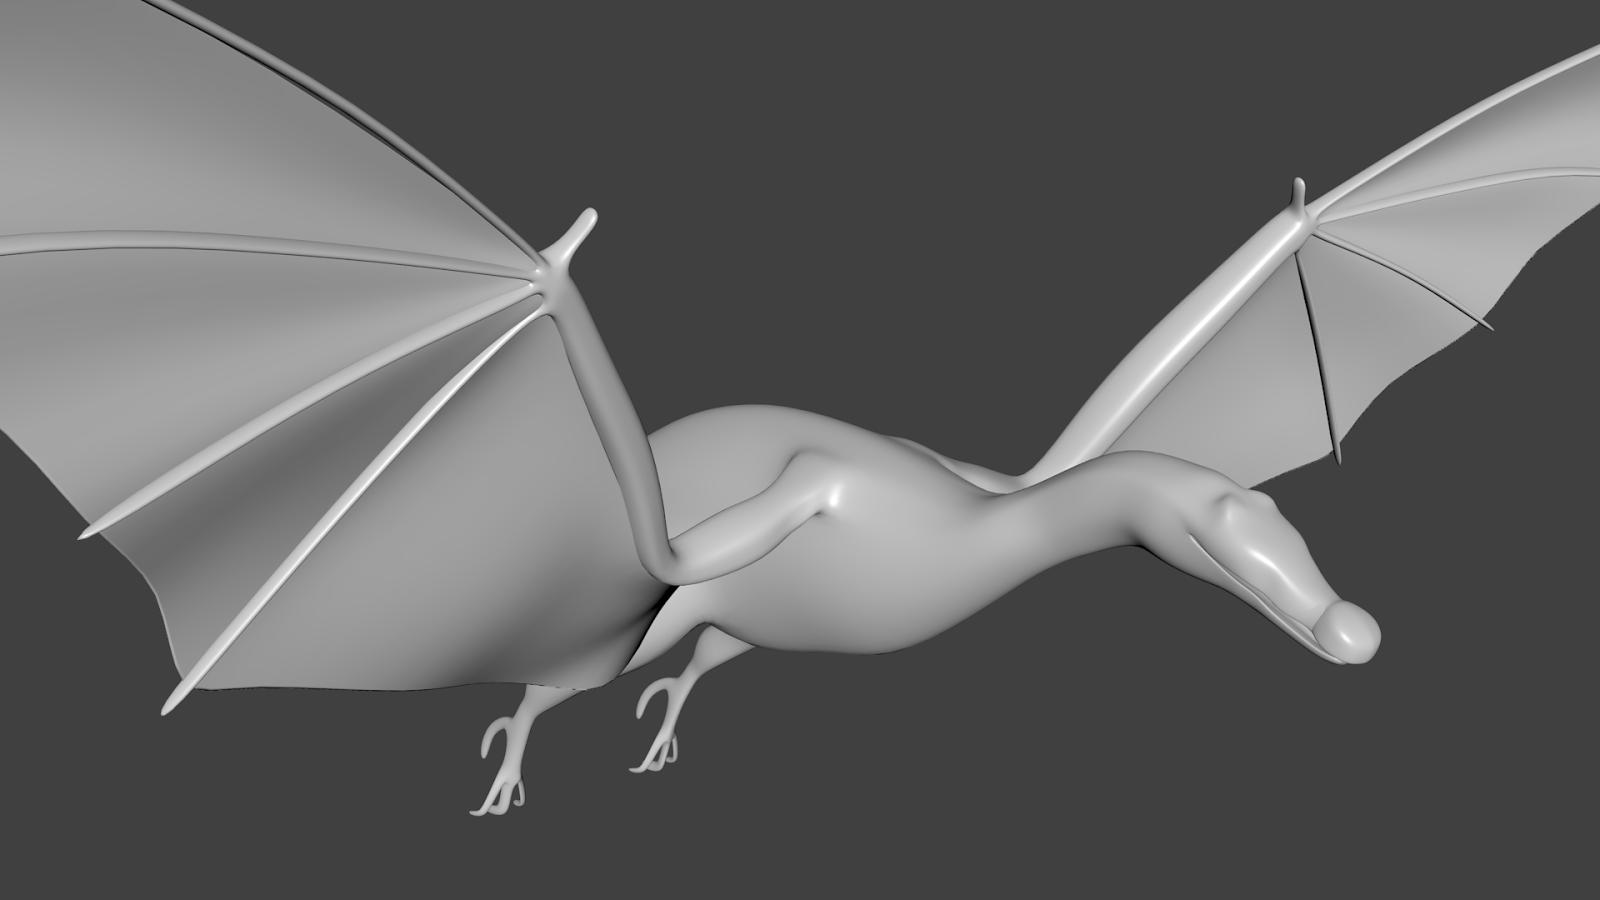
The contest is to make a swamp creature that would scare you to death.  The contest is very open, it just has to be a creature that looks like it would hunt in a swamp and be able to hunt human hunters.  I bean by thinking of ideas for what kinds of creatures live in a swamp and outside the crocodile could not come up with any very large creatures - most others were just vicious little ones.  Then came the tough question, how to improve on a beast that pre-dates the dinosaurs?  My answer: give it wings and longer legs.  The legs are a by-product of needing something to manipulate a catch.  Left is the very early base mesh I am using to block in my ideas.  My key aspects are a crocodile-like head, bat-like wings and raptor-like claws (raptor referring to the group of birds not the dinosaur) .

With the silhouette to my liking and all the main aspects in, I decided to retopologize the mesh adding in what I am calling the mid-level details.  Left is how far I have come, obviously needing quite a bit of work still with this step.  My goal is to add all the teeth, spines, eyes, ears and bony bumps into the mesh before starting the sculpting process.  Mostly because I think these aspects need a little more precision and would look a little odd if left to a novice sculptor.  Note that I started retopologizing the arms because I felt the muscles needed were inadequately represented in he base mesh.  The arms are by no means close to finished, but give a much better image of how I want the final image to look.

Left is the two above images overlaid to give a better idea of what I am trying to make.  Again, living in a swamp, I am trying to make it look semi-aquatic.  The only main detail missing is webbing in the talons.  Once I have finished the retopologizing which may take some time while /I figure out details I want to add, I will move on to the sculpting portion.  My first pass will be muscle tone in the jaw, wings and legs.  My second pass will be small details like scales.  Finally I am going to make an asymmetric sculpt pass to add scaring, damage to the wings, breaks in spikes or teeth.  While I am not sure I will be able to get ll I want to finished by the deadline, I hope to get most of it and use the finished image as a starting point for a portfolio.